Showing posts with label Propagation. Show all posts

Tuesday, February 24, 2015

Baby its cold outside...


Welcome back to another episode of Lost In The Farmer’s Market where the winter doldrums may have slowed things down but we’re still making progress towards the next big thing. This week we have some interesting news in the form of a winter project that may surprise some of you out there. In agriculture we have two primary camps the Organic/GMO-Free group and the Conventional group and to that end there is a variety of products out there for both. It is not my intention to turn this article into a form of ‘us versus them’ diatribe, but rather to talk about the next logical step in the means to prove that those of us in the non-GMO/Organic crowd can do exactly the same thing as the conventional folks minus the petrochemicals and so on.

So for my winter project I set out to build a cloning system with the objective that it be as effective as a compact model that can be purchased through a commercial source. The two examples I evaluated as the basis for what I built can be found at the following two links.


The price increment on these models would be prohibitive for the home grower and since one might typically use a thin solution of plant hormones to encourage root growth well the organic label is then in question. Plant hormones used to promote rooting have to be extracted from a plant chemically, purified then suspended in a solution of some sort, or flat synthesized in a lab somewhere. The powdered rooting hormone found at every garden center is basically a thin rooting hormone held in pure talcum powder, whereas the commercial grade rooting hormones are in liquid suspension. I should mention here that a standard jar of powdered rooting hormone cannot be used with ‘wet’ propagation methods and costs around $6.00 for a small jar with a few ounces of powder that may last a home grower a few years. When you get into the liquid rooting hormones such as Dip ‘n Grow, two ounces can cost up to $15.00, and the procedure for use is very precise. 

To get around this, we at LITFM constructed a Hydro-cloning system from components that one could buy off the shelf at a garden center, supermarket and pet store. As you can see in the below picture our cloner is built out of a 1 gallon plastic food grade container with lid, a 44 Gallon per hour air pump, a coil of flexible air diffuser tubing, 3’ of 3/16th fish tank airline tubing and, six net pots and six neoprene plugs.  In terms of tools I only needed a small sharp knife and a wax pencil. Estimated construction time was about 30 minutes


All the parts you need, total cost is about $30.00.
The first step was to shape the air diffuser coil in the bottom of the reservoir, you would want it to follow the outer edge, and coil evenly inward to spread the diffusion effect so the water in the reservoir has no stagnant spots. I chose the flexible one because it can take the shape of any container and be adjusted on the fly if needed. A large circular air stone could also do the same job.

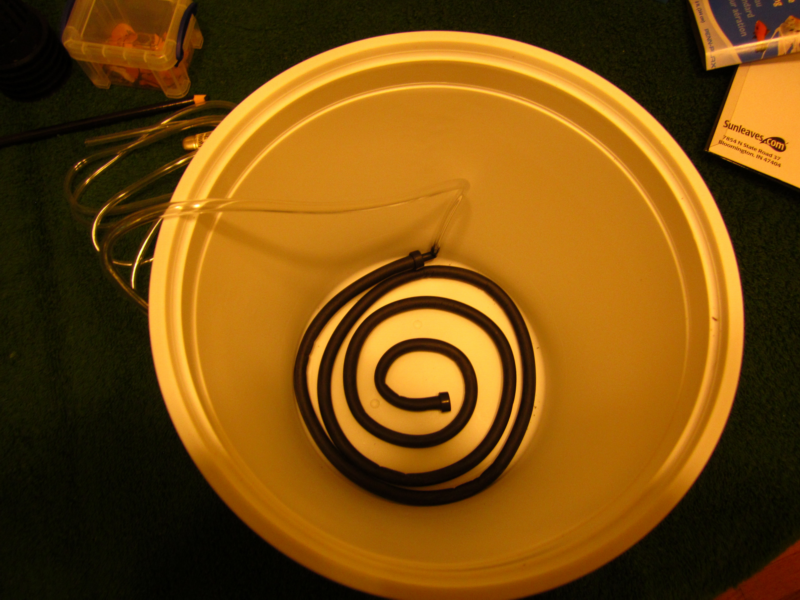
It looks like there’s too much air diffuser but the thing wont bubble over so it works.
The next step is to cut the hole in the lid for your airline to go through so you can position it to your liking. I did not completely cut it out initially so while I did step three it wasn’t in the way.


Yes, this food grade container was a leftover from a holiday party…you can guess what was in it.
Using one of the 2” net pots I used the wax pencil to mark where I cut holes in the lid so the net pots could be placed through the lid to dip into the reservoir.

Theoretically the net pots could be any size you want, I chose 2” for space-saving purposes.
As you can see the cutting is done in this case with a small pocket knife, but a razor or exacto knife would work equally well. Just remember to take your time and be safe while doing this.

This was the slow part of the project.


Presto! The perfect seating for the 2” net pots.
Cutting out the holes for the net pots means cutting inside the marked line so the pots sit on top of the lid and do not fall in.

It is compact enough to sit on a dining room table and quietly do its job.
You can see all six net pots seated properly, and next the little flap near the airline is cut and this completes the body of the Hydro-cloning system. This is a simple little system that produces six clones at a time and cannot have its water go stagnant. The container is food-grade so there will be no worry of the plastic leaching anything into the water, and the best part is that even if out in the lab its mosquito proof because of the diffuser.
Um, for note folks this is NOT a Skittles commercial!
The last step was to insert the Neoprene cutting holders, with trimmed cuttings in them and to turn the system on. The air pump buzzes but is barely noticeable the gentle bubble of the diffuser putting tiny air bubbles through the water in the reservoir is more noticeable. I might add at this stage I added a gallon of distilled water (personal preference on this part) and well you can see the final product in the next image.
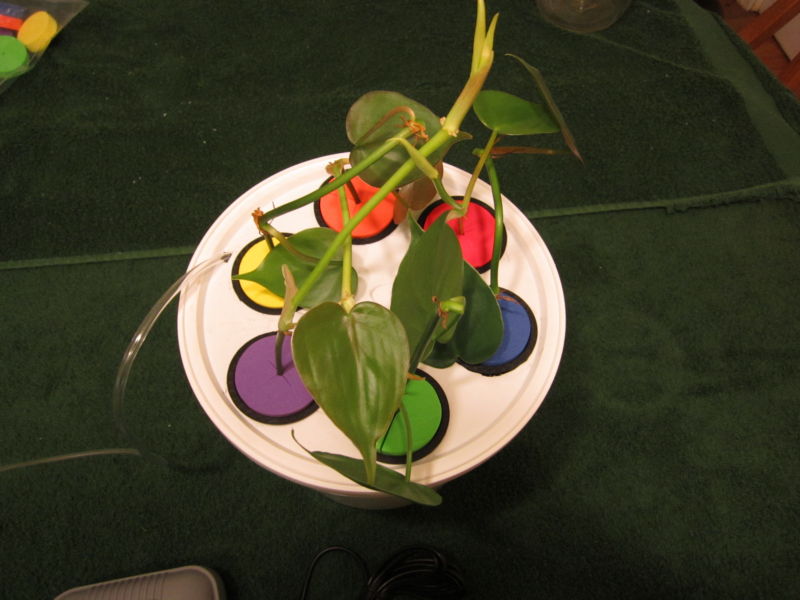
Yup here’s what it looks like in operation.

The first trial plant is a Heart Leaf Philodendron - Philodendron scandens which by philodendron standards is slower to root in water but far more tolerant of abuse then your regular philodendron. The thing is I know no matter what it will root and having grown and sold this species before the time frame for it.  The plan is to run five trials with the system using an increasingly difficult set of cuttings. You can bet the results will be right here when available.

So there you have it another wintery episode of LITFM. This early post comes on the heels of our second frozen precipitation event of the year which means more delays in production schedule. It sort of figures that I get a LITFM project done on time and it snows which may prevent next week’s topic. Either way check us out next week for more wintery mayhem. Don’t forget the Fayetteville City Market is still going on Saturdays between 9:00am and 1:00pm in downtown Fayetteville on 325 Franklin Street.

Thank you for reading!

Monday, January 27, 2014

Keeping out the cold!


Welcome back to a belated episode of Lost in the Farmer’s Market, As this post was intended for last week some editing has been done to shorten the entire thing and you the reader will get two episodes this week. For note no market information will be in this post, only the straight facts about cold frames. The GMO-Hybrid-Open Pollenated topic will be covered in this week’s normal post and will include the market information for this weekends (Feb 1) farmer’s market. Without any further delay we present this week’s topic.

The cold frame is a simplistic device used in gardening, though the models as seen through seed catalogs and garden suppliers has made things a bit confused because their models often make interesting claims.  For reference a cold frame is essentially defined as an auxiliary structure typically used in tandem with or as a supporting element for a greenhouse. Cold frames often take form as a low structure typically no taller than three feet that bears a transparent roof that is removable or that can be raised on hinges to allow access. The purpose of a cold frame is to protect plants from adverse weather (cold or wet) and provide additional growing space allowing for an earlier or later growing season. In some cases cold frames are used for storage of dormant potted plants such as amaryllis, tulips and certain types or root vegetable.  Typically a cold frame is not heated, and thus its heated version is appropriately called a ‘Hot Box’.


This model falls under one of the more ornate home gardener types. While perfectly affordable it’s obviously not intended for mass production use, even so it’s design is very practical. (Jung Seed)
With all that said cold frames come in a slew of styles and materials but also these propagation units serve as a critical point in gardening use because they can be built from almost anything. Commercial models make use of aluminum fittings and polycarbonate panels to allow full entry of light whereas units marketed to home gardeners may be comprised of rot-resistant wood fittings and polycarbonate, Plexiglas or glass fittings depending on cost level. With that said the ones you buy are as varied as your willingness to spend.  With that said it is not expensive to build a cold frame yourself nor do you need those fancy parts and pieces to do so.

This type of cold frame comes in single (pictured) and double-sided models and is composed of polycarbonate panels and aluminum fittings. It is clearly intended for both home gardeners and semi-professionals. The price range is good and its size allows for numerous units to be placed in rows. (Park seed)
Of course it bears mentioning that when one is building their own cold frames one might not build them entirely above ground. In-Ground Cold frames typically are no more then 6-8” above ground level and may be upwards of two to three feet below ground. Such units may be walled with brick, or some sort of edging or more commonly cinder block. The advantage to this sort of cold frame is that the soil itself is a great insulator, you require a minimum of materials, weed encroachment is limited and barring major weather they rarely have water issues.


 This in-ground unit is constructed into a hill with an eastern facing to maximize light exposure for the plants inside. Notice the coverings up top are hinged and effectively permanent. The interior is lined also to prevent root encroachment.
Now when one is talking about building their own cold the options for how and with what are quite open. At the ranch we’ve constructed two working models thus far pending the installation of a third. Let’s start with the one I like to call the “Prairie Deluxe”. It’s called that because as the pictures show the walls are mainly made of wood planks and the main support are brick struts. Wood by the way unless actively burning has a poor thermal efficiency and therefore this unit is only good at short term storage of larger plants. Even with the lack of efficiency, the use of a blue tarp allows might to pass through and thus, the plants still get some light and transfer of air and moisture can occur albeit at a reduced rate.


As you can see it's very simply designed. We literally turned one of the low-tech growing benches into a cold frame by moving the wooden planks to the sides.
The original supports act as the only hard structure in the design, broken or irregular bricks hold the planks in place. The  brighter blue tarp in the background serves as the cover.

The second model is more in line with the principles of a basic cold frame. Nicknamed the “Brick****haus” (insert humorous expletive after brick). This tiny cold frame makes use of albedo, location and refraction to prevent cold damage to the plants inside. The bricks are faced so that the smooth side is facing in while the rough decorative side is facing out. This is because the decorative size is darker, and tends to trap more heat from solar exposure; the smooth sides tend to reflect it more. The inside thus never fully freezes. The glass on top is made of two panes of tempered glass for outdoor use. Both panes were salvaged from the wrecked door after the break in. Inside this unit right now are several Cilantro plants which can withstand freezing and cold weather anyway but benefit from the wind protection and protection from the recent temperature fluctuations. Ironically I guess you could say that some of that cilantro is likely to be the first herbs at the booth in the market in 2014.

Very simple by design, the brick cold frame is portable and very efficient by cost and material standards.
In short, cold frames are a useful tool to the home gardener as well as the producer, in a way they are the step before one considers the installation of a true greenhouse. Given the strange weather as of late; cold frames may become quite important to the sustainability movement because of their versatility and variety of styles to meet every gardener’s preference and budget. Of course the final decision rests with all of you out there what is it that you would like to see?  This brings to a close a belated episode of LITFM, Stay tuned for our next episode which discusses in brief the issues of GMO, Hybrids and Open Pollenated plants.

As always folks, Keep em Growin!