Showing posts with label Asiatic Lilies. Show all posts

Thursday, February 4, 2021

Gardening In Winter Part III

 Welcome back to another Episode of Lost in the Farmers Market. In the last episode I spoke here about dealing with a Carolina Cherry problem. For those just tuning in, the problem is simple enough at a glance, a roughly 30 foot tall Carolina Cherry that is healthy but, has developed a curved shape. Normally in the landscape this isn’t a problem but this curved tree was doing three things that posed a problem. Firstly, it was casting enough shade over the memorial lily bed that my Asiatic Lilies were growing in crooked. As an addendum to this problem the roots of the same tree were competing with the lilies for water and fertilizer. Second, this tree produces a lot of seeds and on a yearly basis this means pulling roughly a hundred or more seedlings out of the lily bed. These seedlings are another source of competition for the lilies which are already having a hard time. Also, it should be said that while some trees have the decency to have a biological mechanism to prevent their seedlings from germinating beneath their canopies, Carolina Cherry Laurels (Prunus caroliniana) do not. The third problem is the projected growth of the tree which eventually would make it a hazard to the house and other nearby desirable shrubs. Another issue complicating the actions taken was time  Taking down a thirty foot tree by yourself safely is time consuming and requires preparation work so this entire project was done over several weekends with work stopping due to a lack of daylight. As an additional aspect to timing, I had to bring the tree down before the lilies emerged and preferably before the daffodils really got going. The Daffodils emerged in mid-January this year and so the project got fast-tracked. So let’s get started with this winter-structural project so you can see the process as told by photographs. This will be a photo-heavy post so you might want to look at the following on a computer. 


The calm before the clipping; here is what the area looked like before I started. Look carefully at the tree in the center, that is my primary target. That Carolina Cherry Laurel has a double-leader meaning two primary growth points and is dangerously curved. A double leader often means a tree might split in half if a sufficient load of ice or wind is put on it and that can spell disaster.
Here is a side-view, in the upper part of the picture you can see the curve is almost a 45 degree angle. This is bad for business because it blocks light, and showers the bed below with seeds which causes problems.
Step one, all solar lights, statuary and such are removed from the Memorial Bed. You can see a lot of little Carolina Cherry Laurel seedlings in the bed, they get pulled out in this step so that the lilies have no competition.
Clearing the hedgerow a bit is the initial phase of pruning because it allows me to see the primary target better which makes the big job of cutting it down safer.
I decided to clear the entire hedgerow since it was all kind of overgrown. This has the advantage of giving me more room to to place the ladder I'll need to use in later phases of this maintenance operation
The hedgerow is brought under control all the way up to the shed, that's fifty feet of hedgerow. Most of the branches trimmed are less than 0.5" so easy stuff, hand pruners and the occasional use of a folding saw.
As I run out of daylight, I do another pass over the Memorial Bed, no Carolina Cherry Laurel seedling is left standing, but there is one more task at hand.
As daylight fades and I am nearly out of time I use three bales of Pine straw to cover the Memorial Bed, replenishing it's mulch cover. The bales aren't pretty at this stage because they've been sitting out but that will change once they dry.
This photo was taken before I moved onto the next phase. The pine straw looks great because it has dried and settled into place, you'd never know this was the site of a Carolina Cherry Laurel seedling mass murder. It was as of this point that I stopped using the Pole Pruner and Extending Pole Saws since they were not cutting it (pun intended) against the main target it was time break out a little surprise for a certain tree.
*Tool Time Grunting Intensifies!* Yeah, I ordered an all-electric 40v 8"bar Pole Chain Saw from Lowes and it arrived a few days before this photo was snapped. It's surprisingly quiet, easy to maneuver and a certain tree suddenly learned who was boss in this garden. If you look closely in the picture the limb that is down is the front limb of the double-Leader I mentioned. Double leaders can be unpredictable in how they fall because the shift in weight can cause the branch crotch to split or the wood can be twisted internally. The saw made quick work of this.
The pole saw made quick work of the down branch itself. It took no time at all to start lopping things off and the slow part was dragging things to the curb.
This is the main trunk of that first leader I cut off. It tried to put up a last bit of resistance with a slip of wood holding it on at an angle where I could not get the saw in. So I cut away any part of it touching the ground gravity did the rest. The trick  is letting the branch's own weight bring it down, but you want to give it some room just in case.
So now with one half of the tree gone the garden already looks better. My trusty ladder posed for this shot and  for note that is a wood 1" thick board under the small feet. I put that there so they don't sink in and put me at risk of falling off.
The second leader is down. The ladder is toppled because earlier while getting off it I misjudged the number of steps and fell off. The ladder decided to join in the fun and thankfully the soil was soft. I got a nice bruise on my left thumb for my trouble so the trees got 0.05 score, to my 8.0 score.
That second leader fight back, as I cut it's last attachment point it fell towards me and against gravity and slapped me in the right hand while on the latter, Carolina Cherry Laurels 0.10, me 9.0 score. Anyway after it was downed and cut up the above picture is what was roughly left.
Here is a side shot, notice the big difference? Side by side you can see I took out ten or more feet of tree canopy. The hedgerow now looks almost straight and things are looking pretty good.
So for this step, I reinstalled the statuary and shepherds hook with a wind chime and then I pulled back the new pine straw, and applied a mixture of Hollytone and Bone Meal. Let me tell you, bone meal gets airborne much easier that powdered limestone. There wasn't even a breeze at that time and it looks like a flour factory exploded.
I was glad I was still wearing head head an eye protection and had on a fabric mask due to the chainsaw because there was dust everywhere. After a few minutes the exposed bed looked like this.
As daylight ebbed and tiredness started to set in, the final tasks of the day were at hand. I watered the fertilizers in (yes you should water bone meal in) and I put the mulch back using a pitchfork. Since it's winter and the irrigation stuff is offline I used a watering can to water things in. And this concludes the major operation to bring down a crooked tree and it's terrible offspring. The tools I used to make all this happen are as follows; Pruners, Folding Hand Saw, Extending Pole Saw, Extending Pole Pruners, Pitchfork, Small Bucket, Trowel, 1 Gallon Watering Can, and a 40v Battery Powered Electric Pole Chainsaw. This far this project has produced two piles of branches roughly eight feet long and about two and a half feet high. The tree in question was an estimated 5" caliper at maximum, but I have yet to take down the central trunk yet, that is the next operation.

So I hope all this tree chopping fun helps all you gardeners out there who are undecided on how to go about handling the problem. A well thought out plan of action goes a long way towards turning your imagination into reality. Oh, this post was not sponsored or paid for by bLowes or Kobalt, It just so happens that I already had a Kobalt Electric string trimmer using the same battery packs as the chainsaw they offered and figured a pole chainsaw will solve more problems at the Botanical test gardens than it creates. Plus it's a lot harder to hurt yourself with a 8" blade electric pole saw than a conventional one. With that said lets look at some other Test Garden Goodness.

This is the week before last's Kale Harvest, six types. From the upper left; Scotch Blue Curled, Russian Red, Marrow Stem, (lower left) Black Magic Lacinato Kale, Winterbor, Lacinato Kale. When the Rainbow Lacinato is ready expect photographs.
Last Week's Mustard Harvest. Japanese Red Giant is up top and Mizuna Mustard is on the bottom. Mizuna is mild and really good in soups and raw in sandwiches or salads. JRG mustard is more like a traditional mustard green but has a more pungent garlic flavor.


Here we have the largest leaves in the harvest, the middle leaf is 21" long which is normal for Japanese Red Giant. You get a lot from individual plants but spacing is important.

With all that garden goodness covered this is the part of the blog where I have to advertise for the Fayetteville City Market. Now I know you readers probably don’t much like advertisements, but by booth at the City Market helps to cover the costs of running the test garden and literally maintains the Research & Development budget that is used to bring you the information that has made up the backbone of this blog. Also, as of the start of 2019, my booth can now process credit or debit cards thanks to the acquisition of s a Square reader so your payment options have doubled. With that said, if you want to get some GMO-free, Organic vegetables, herbs and fruiting shrubs come on down to the Fayetteville City Market on 325 Maxwell Street in downtown Fayetteville between the Hours of 9:00 am and 1:00 pm on Saturdays. Even in bad weather the market goes on though you might have to look for me under the ‘arches’ of the Transportation Museum’s front entryway.

Fresh Produce:
Soup Kit: Parsnip: $6.00
Soup Kit: Turnip: $6.00
Garlic Bulbs: $1.00
Seasoning Packets: $2.00
Shallots: $2.00
Parsnips, 1lb: $4.00
Turnips, 1lb: $3.00
Onions, 1lb: $3.00


February House Plant Collection:
Haworthia 'Fat Albert': $8.00
Haworthia 'West Jogo': $7.00
Devil's Backbone: $7.00
Sausage Spurge: $4.00
Starfish Sansevaria: $7.00
Aloe 'Sunset': $8.00
Aloe 'Checkerboard': $8.00
Rhipsalis, Slender: $7.00
Rhipsalis 'Drunkards Dream': $7.00

(More plants TBA, Stay Tuned)

Hatiora salicornoides 'Drunkard’s Dream’ – Drunkard’s Dream Mistletoe Cactus


This plant was once known as Rhipsalis salicornoides, but the name changed within the last two decades and you will find some of these plants with the old name on their tags. This is a true cactus and originates in the eastern regions of Brazil. It is found naturally in moist forests, the savanna and rocky areas in an elevation range of 660 to 1750 feet. It can grow up to three feet tall in cultivation and its stems are composed of segments that can be up to 2” long. If exposed to the right amount of light it will bloom in roughly February or March and bear dozens of small yellow to orange flowers that look like miniature Christmas Cactus flowers. This is the plant for you if you have no success with Christmas Cactus or are simply bored with what Christmas Cacti have to offer. Drunkards dream is easy to grow will tolerate a range of temperatures but does not tolerate freezing. This variety of Mistletoe Cactus got its name because its segments are shaped like little wine bottles. This plant can go out for summer and is easily propagated by snapping off a branch with at least five segments and sticking it in soil, no rooting hormone needed.


We have a new place to share information and work on groovy sustainable stuff!  You can look for Sustainable Neighbors in our own Nextdoor.com group under the name “Sustainable Neighbors of Fayetteville”. You don’t have to live in Fayetteville to join but it is a private group so feel free to request to join us if you are signed up on the Nextdoor.com site.

https://nextdoor.com/g/ybvdm226x/?is=nav_bar

Unfortunately, Covid-19 is still mucking up the works in terms of meeting in person. The good news is that Sustainable Neighbors does have a Discord Server. You can request access through our Meetup.com page or you can request access via our Nextdoor.com group. The meetup.com page is below for anyone looking to join us.

https://www.meetup.com/SustainableNeighbors/

Since our meetings have an open-door policy you don’t need to buy anything or maintain any sort of attendance standard, you can come on in and join the meetings. When this Covid-19 mess calms down we may be able to resume normal in-person meetings. If not, you can always send me questions through this blog or visit the farmer’s market. This is the third LITFM post of 2021; stay tuned for our next post on or about the 18th of February. Don’t forget to check out of YouTube videos at LITFM-Garden Shorts.

Monday, April 10, 2017

The Last Act


This is a special episode of Lost In The Farmers Market. It is not special because I’ve run across some new breed of plant or gardening technique. It is not special because there is an April Fool’s Day trick written into this post. Honestly If I ever posted on time I’d think that would be trickery enough. No, this time I will be discussing in detail the construction of a garden bed and the clearing and adaptation of land to achieve the goals of a given project. 

For those of you who do not know, On February 5th at 3:00 pm my mother passed away due to complications of Ovarian Cancer. She was diagnosed in October of 2015, and it was at stage four by the time it was clearly diagnosed. This made for a long battle that lasted seventeen months. In one of our conversations while we were at the funeral home sorting her affairs in advance just in case the worst happened she asked me what I would do with her ashes after she was gone as she intended to be cremated. I honestly had no idea as it was a new idea; I mean the idea of having the sole responsibility to lie to rest someone’s mortal remains isn’t something to be considered at the spur of the moment. It’s something you think about for a while and find (hopefully) the most considerate option. I asked her what she wanted as I had no idea what to do in that given circumstance and seemingly randomly, she asked if ashes made for good fertilizer. Honestly this fell into a strange grey area for me because I knew of potash and that the word alkaline came from a Arabic word for wood ashes but I had never really heard of the idea of using human ashes as fertilizer. Chemically I suppose the plants growing on such a plot would not know the difference, ash is ash give or take a few trace minerals and nutrients, but I doubt anyone would dare eat any food grown on such a site. I told her that I did recall that ashes and bone meal did help bulbs grow and she thought about this for a moment and said that she wanted ther ashes to be used as fertilizer for a bed. I asked her what she wanted planted there and she asked for ‘Lilies, like the ones at my house by the mailbox… but white.’ And that cemented the plan for the interment of her mortal remains. Thus this post will cover the construction of the memorial bed and the associated projects leading up to its completion.

To frame the series of events, Mom died on the 5th of February, and her Funeral was not until February the 19th. Normally this would be a major problem but mon chose to be cremated so the actual memorial service could be delayed by two weeks to allow family and friends to come into town to pay their respects. Work on her memorial garden did not start until the 22nd of February because of the complications of handling the funeral and its aftermath. On the first work date, the first tasks on hand in order were; survey the site, determine exposure to sunlight, assess problems with the land and begin initial clearing if possible.

The future site of the memorial garden as seen when facing towards the front yard.
The future site of the memorial garden when facing towards the  right hand side of the yard.

The site itself is relatively full sun with a 5-8% slope give or take. The sand there is relatively sandy and organic matter poor to the point that it will barely sustain sweet potatoes and a number of crops grown there have failed. Some of you readers can see the raised mound where prior attempts to grow things in the area have been tried and were unsuccessful. The overhanging trees are mainly composed of Carolina Cherries (Prunus caroliniana), Tree of Heaven (Ailanthus altissima), and the occasional oak or hickory. The first order of business was to lop off any overhanging branches so that the new garden has no competition from weed trees and in the image below you can see the beginning of the pruning that was talked about in March's post.

This pile of cut tree limbs is just the beginning.

 Work did not resume for a few days due to weather and other factors  and it was not until the 1st of March that things got really interesting. During this time the hedgerow clearing project was underway, which cut all the privets along the driveway down to a three foot height but also the clearing of the land occurred also.  I raked away small debris, and took measurements of the area to understand just what I was working with. The bed would be 9 feet by 8 feet roughly if I left the existing edge of the old bed mostly intact. 

The mound with the leaves and small debris cleared is still not much to look at.

It also meant that my original plan to place one white Asiatic/Easter lily bulb per year my mother lived would not fill the space. She lived 77 years and by my calculation I had room for at least 88 bulbs. I knew that My aunt was sending 12 bulbs which meant that I had to worry about 76 more with room to spare so the planting list ended up going from a simple 77 bulbs to something like the following.

6x Annika Asiatic Lily
66x Casa Blanca Asiatic Lily
17x White Trumpet Lily
20x Star Gladiolas (Peacock Orchid, Gladiolas acidanthera)
3x Hymenocallis (Preuvian Daffodil)

All of the above have pure white flowers except the gladiolas and the Annika lily but more than anything else all the actual lilies were known for size and scent. In total this meant there were 112 bulbs in the bed which guarantees there are no bare spots. Of course while waiting for the main shipment of lily bulbs to arrive I had the bulbs sent by my aunt and the buffer bulbs I'd bought (gladiolas, Hymenocallis, annika) start to sprout. This was a bad thing because Asiatic lilies are a specific type of bulb that can die very easily if they dry out. For comparison tulips and true daffodils are called tunicate bulbs which means they have a papery husk to help them survive longer, bulbs without this are called imbricate bulbs and they don't have such a good shelf life.  As a stopgap to avoid loss of perfectly good but sprouting bulbs I had to partially plant the garden.
The first step to bed preparation in this case was to remove all the spent soil while leaving the edges of the bed relatively standing.
The 8"x8" tamper was useful in flattening and leveling the inside of the garden bed and it's walls.

 The early planting and excavation occurred on the 19th of March,  once the old soil was excavated out of the bed, the first decoration fot eh new bed was placed. Although the picture does not really show it, that is a double-shepherd's hook with a solar powered hummingbird light facing towards the house and a Woodstock wind chime facing towards the rear of the garden. Also in the above image you can see that the hedge row was effectively cleared by this point.

The fill soil of choice for the project was Black Kow and this is the first four cubic feet out of ten needed to complete the project.
It isn't hard to see why I picked Black Kow, compared to the existing soil it's like literal night and day in color.

 The picture just above needs some explanation, the chicken wire is there to keep squirrels or other critters from digging up the bulbs. Also the long area of Black Kow on the left is where all the Asiatic lilies I had at the time were placed. The spot where the square grey paving stone is placed is where the Gladiolas and Hemerocallis are planted, the gladiolas are in front and the Hemerocallis are in the back just before the shepherd's hook.   Work around the site and along the driveway would continue while I waited for the big shipment of lilies to arrive.

Add caption

 As luck would have it, the shipment of lilies arrived on April Fool's Day, and due to this I resumed work the very next day, the first Sunday of April almost two months to the day my Mother died. The above image shows what the beds looked like after I removed the chicken wire in preparation to work. Some of you are wondering what the two objects are in the image above. The both hold critical significance to the memorial because one of them meant a lot to my Mother, and the other had spiritual significance to her. The statue is of a howling wolf, and at some point she went to a Native American powwow and found out that this was her spirit animal.  But how I came into possession of this unique statue is an interesting story unto itself  you can scroll down for that as it's just below the wolf's closeup. The second Item is a inscribed stone that sat near her front door, many visitors never noticed it but she took it wherever she called home. I'll explain that in detail below the stone's image.

4-2-2017

 This wolf statue wasn't at all what I was looking for when looking for a suitable marker for the location where here ashes would be interred. I was looking for something more symbolic I guess, maybe a cross or an ankh, something that espoused her life. One Sunday after much searching both online and in person I found myself at one of the many garden centers in the area, a Place called Big Bloomers and I figured, 'what the hell they have statues...lets take a glance.' I'd arrived there late and had about twenty minutes until closing time and begun looking through their selection of statues, most were just bland. Honestly I still don't know who thinks putting peeing cherubs in a garden is acceptable but to each their own. I wanted for about ten minutes until I hit the section with animals, and they too were bland, kittens, puppies varied farm animals and so on and then there sitting by itself with no others like it was the wolf you see. I looked at it and could not help but wonder what it was doing there as it didn't match anything else and it was literally the only one. On examination it had a price tag so it was inventory but when I got up to the booth they seemed not to know they had it either. Either way I ended up buying it with little care for the price as it was exactly right. I've been back to that nursery twice since and the spot where the statue stood is still empty so perhaps the old saying is right you don't choose the stone it chooses you. Ironically I had bought the square grey paving stone as a base for whatever statue I planned to buy, but the wolf has it's own base which  then means I can use the paver for another problem I had no solution for at the time, the installation of a birdbath nearby.


Mom bought this stone while on Martha's Vineyard and she always placed it by the front door of her house. Many have entered and few have noticed it or even read it and yet it has sat there like a mute sentry to all who pass. She used to love going to the Vineyard during the early summer before it got too hot, but she found a similar experience in going to Hilton head for a week or two every year up until she was too sick to go. I figured it too was an appropriate thing to place in the memorial garden

Her Urn, it's carrying bag and, the dried roses that will fill the urn once it is emptied.
 So here's the urn, the velvet bag it goes in and, the dried roses are from the floral arrangements at the memorial service. Since all the arrangements had white roses with exception to the living arrangements I thought it would be a fitting tribute to fill the urn with the petals after the fact so something would be in there.


I will say this I did not know what to expect in the urn. But ashes dont take up much space but they seem rather heavy. One could say that the the weight of your final task adds to this or is most of this but I am not certain. The movies and television clearly get what cremated remains look like completely wrong. What came out of the urn was light grey powdery and without and noticeable 'chunks'.... though I was glad the wind was still because any wind could have blown this stuff all over the place.  So I sprinkled the ashes gently in the remaining bed area that needed filling and set the bulbs down in a pattern as seen in the next photo.


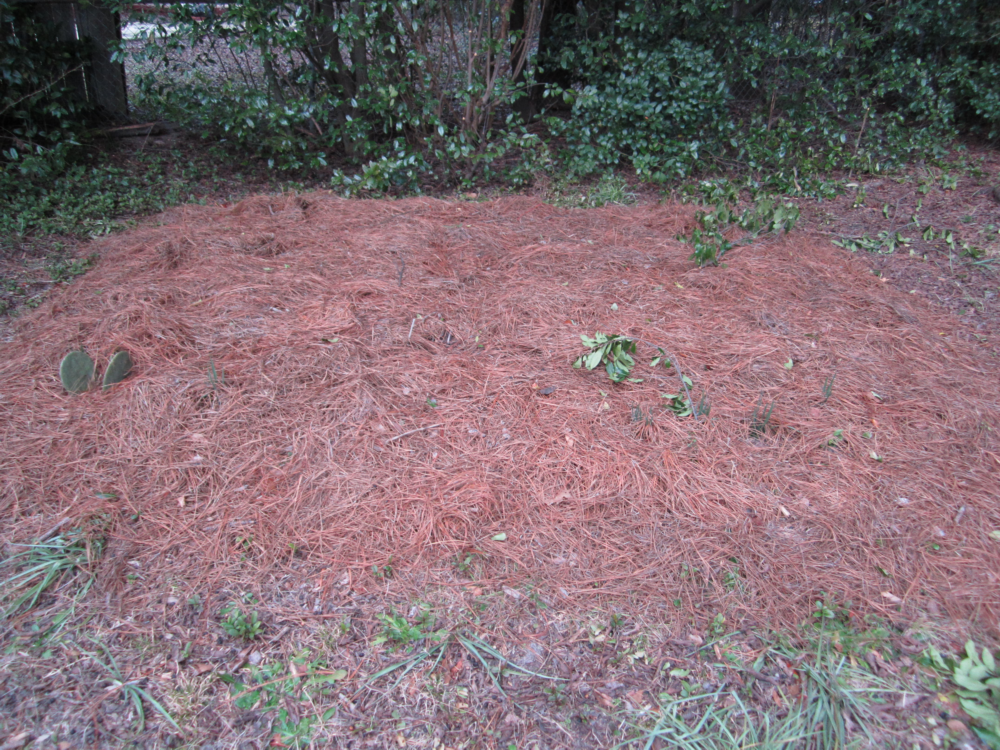
 No it's not the photo angle, your eyes or editing, those lily bulbs are very large. Large lily bulbs are a good sign they are healthy, vigorous and ready to grow. It tells me that despite the garden's cost overruns everything will look great. The pest part is the photo below with the soil filled and the mulch in place.


 This site without a doubt which tourists can see during the Urban Farm Tour is most definitely a place of final rest. In case you are wondering, the Bulbs were planted at an effective depth of 4" with an additional 2" of mulch on average. This may seem a bit shallow but this bed is going to receive more care than my normal ones for several years to come. normally lilies are planted 6"  down with out considering the mulch but since this already is a raised bed I wanted their roots to be at a high to get the most out of runoff during rain storms. I also know that the nutrient from the Black Kow will drip down to the roots of the lilies also while immediately having it on hand will accelerate their first year growth.

Feel free to ask any questions you like in the comments for this post and stay tuned for some more garden activity next month.