Sunday, April 29, 2012

The Making of Black Gold

Spring is an amazing time of the year isn't it, right before your eyes you get to watch that which seemed dead spring to life and the seasons go from cold to warm in a span that seemingly is to short. With that in mind we at LITFM are prepared to bid April a warm farewell as this is the last article of the month and May looms large up ahead. Today we have another double-header combination of a plant spotlight, and main article. Originally I had planned for Orchid Primrose to be the plant spotlight but the plant isn't very photogenic, and half of the plant spotlight's value is a clear photo of the subject. In it's place is an interesting and under-utilized plant under the name of Annual Passion vine, Passiflora incarnata.

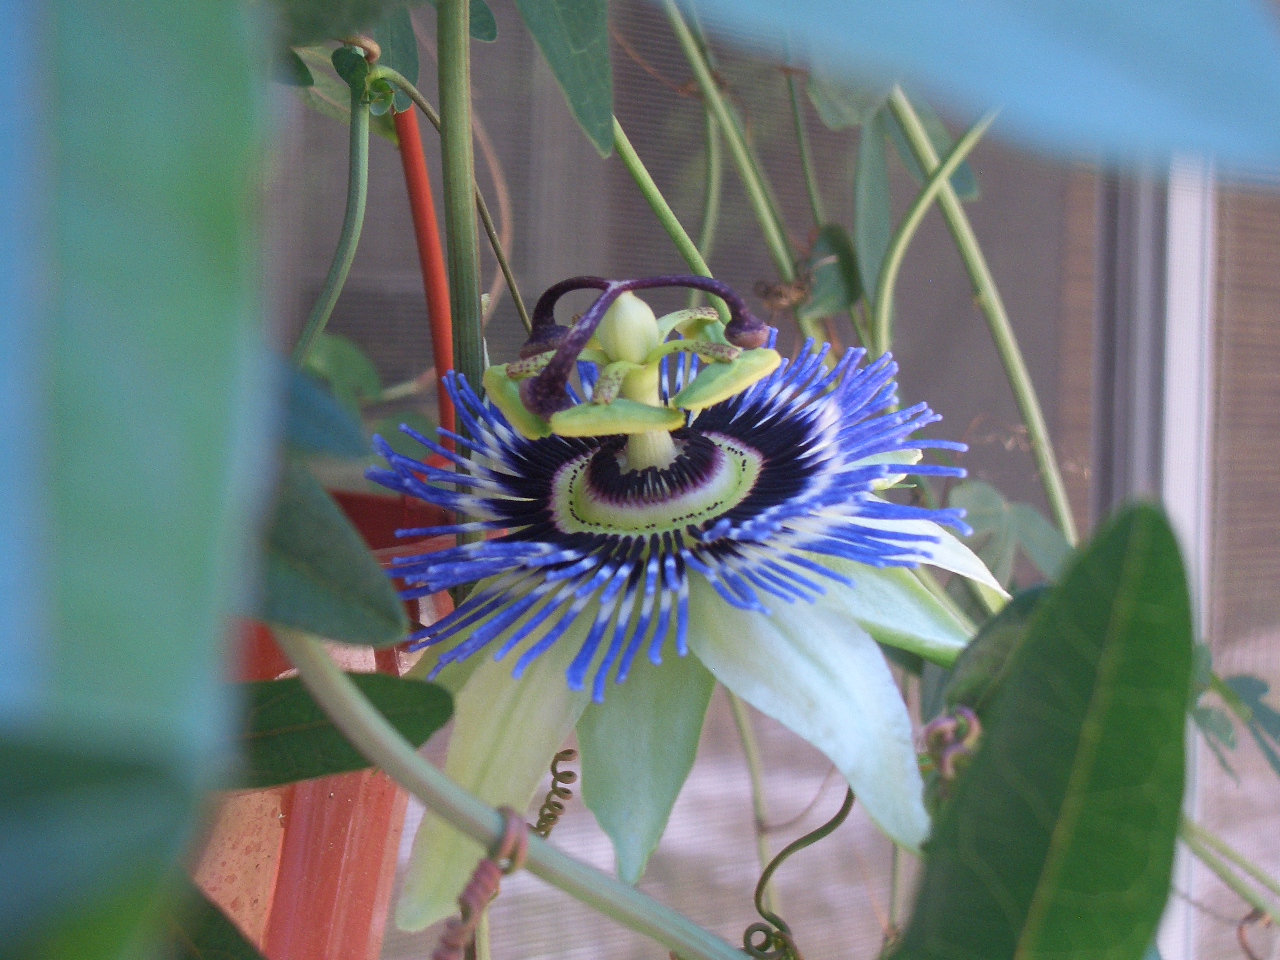
This is the first bloom from a pair of passion vines grown from seed purchased in a packet at Lowes, burpee apparently does not sell these seeds anymore, what a shame with a flower like that.


Now it is important to note that in literature the terms passion vine, passion flower and passion fruit all refer to the same species of plants and may be used interchangeably, however I’ll be using them in context, passion vine means the plant and so on.

First and foremost is the fact that most members of the passiflora species are aggressive climbers and use curling tendrils to scramble up any vertical surface be it a wall or another plant. The name ‘Passion Vine’ is derived from the physical aspects of the plant and is from the ‘Passion of Jesus’ in Christian theology. Roughly around 15th or 16th centuries Spanish missionaries noted the unique shapes found in this plant and in particular the flowers as symbols of the last days of Jesus and in particular his crucifixion.  The following parts of the plant were taken to mean specific symbolisms:

  1. The pointed leaf tips were thought to represent the Holy Lance.
  2. The tendrils that the plant climbs with were thought to represent the whips used in the flagellation of Christ.
  3. The ten petals and sepals represented the ten faithful apostles, excluding St. peter the denier and Judas Iscariot the betrayer.
  4. The chalice shaped ovary with its receptacles represented a hammer or perhaps the Holy Grail itself.
  5. The 3 stigmas represented the three nails, while the 5 anthers below them the 5 wounds, for note four by nail one by lance.
  6. The blue and white colors of the flower in radiating bands represented Heaven and Purity or a halo.
  7. The flowers filaments represent the crown of thorns.

Biblical symbolism aside the passion vine is an easy to grow plant that sometimes is sold as “annual” passion vine. In fact as I mentioned before I got the seeds for the passion vine pictured above at Lowes in a Burpee seed packet, apparently that seed line has been discontinued. The seed are somewhat fickle to germinate as out of the 20 seeds only two germinated and those two were incredibly temperamental at first. With patience you can have some young passion vines suitable for careful maturing in a spot that receives some morning sun has good soil quality and regular water and fertilizer. I honestly don’t know if it would take anyone else two years to get a bloom out of these vines but the picture above was taken just a week prior to the writing of this article. Now why use passion vines, well the answer there is simple, the lobed foliage is a deep green color while the exotic and sweetly scented flowers are simply stunning. When you consider the custard-yellow colored fruit which is edible you get a wonderful plant that does a lot and asks for very little.

 
Onward to the main attraction, ‘The Making of Black Gold’, a brief discussion on how BL2’s compost product is made.  A number of you out there reading this may have had the chance to hear me speak about soil science on more then one occasion at the Neighborhood Grange / Sustainable Neighbors meetings. Compost is a very personal thing, everyone out there who has successfully operated a compost pile has their own way to produce it. Compost literally provides to you what you put into it, and to that end our own Carolina Gold is a specific mixture of key ingredients that creates a balanced compost product.

The bucket is used to hold horticultural waste such as plant parts and soil while the Tupperware container is kept in the fridge and is used to store kitchen scraps.

The process starts with kitchen scraps and horticultural waste from normal greenhouse operations which are collected in special sealed containers and then added to a pre-composter. The pre-composter is simply a 35 gallon lidded trashcan with holes in the bottom. 

 The Pre-Composter is a simple affair, a 35 gallon wheeled and lidded trashcan used to hold composting materials.

The pre-composter serves as an area where initial decomposition can occur while decomposers such as worms can introduce themselves to the compost and be protected from predators. The pre-composter is emptied only when it is full to the brim with materials and this may take a few months to do depending on the season.  Once the precomposter is added to the main bin, regular applications of soil and grass clippings complete the effect while alternating layers of straw and pine straw maintain aeration.

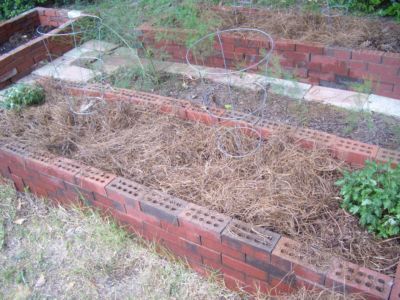
What you see here on the left is the actual compost pile with it's pinestraw 'cap' still on, to the right is the leaf mold pile, which will be moved over once the main pile is emptied.


Looking more like an mangled lump then a compost pile this is the 'slow burn' pile, a larger pile where large branches, excavated soil and anything else that will take longer then a year to rot.


 The best tools to manage a compost pile are a rake, shovel, pitchfork and wheel barrel, as these four tools allow you to do all functions with a minimum of strain on yourself, I do recommend long-handled tools to make life easier.

The total time for everything the naturally decompose is about eight months, so the following spring after the pile was last emptied it has shrunk to half it’s original height and the cap of pine straw is carefully removed. Once the cap of pine straw is removed the next step is to collect the compost material and use a shovel or pitchfork to move it into a wheelbarrow in preparation for sifting or application

 Now with the pine straw cap removed you can see the good stuff underneath, apparently nearly a year of decomposition has done wonders to the stuff in this compost pile.

Now this is an ancient debate amongst gardeners, to sift or not to sift? I personally prefer sifting because it takes all the chunks and bits out however you can use raw compost as a soil amendment, the problem is it may or may not look very good in the picture below you see my basic sifting setup. The wheel barrel on the left holds the unsifted compost from the pile, the silver-gray bucket has the sifting screen,  the beige tub is where the sifted compost goes when the bucket is full, and the black nursery pot is used to hold the 'chunks' left over from sifting. The sifting screen isn't very fancy, in fact it's a piece of bent hardware cloth, that drapes inside the bucket but also hooks around the edges of the bucket. If you look carefully at the tailgate of the truck you will see a pair of black gloves, I generally wear those in case of fire ants, they're the rubber coated type.
 Finally BL2's infamous green pickup truck, that vehicle that strikes fear in the hearts of bad landscapers everywhere makes it's first cameo appearance in the blog.

 Sifting is accomplished with a side-to-side rocking motion or hand motion effectively shaking out all the fine and medium particles in the compost while leaving the coarse and large ones atop the screen. Eggshells however have to be re-crushed and passed around the screen as they rarely break down enough to pass through the mesh. The final product will of course have some visible eggshell bits which adds calcium to the soil which encourages good soil structure and fertility.

 The screen is incredibly simple, yet it works quite well, it's draping nature makes sure the bucket never fills beyond 4 gallons.

The finished compost product due to the sifting is more regular, the particles are even and, as a bonus it blends everything in the compost evenly so there are no areas of clay, lumps or other irregularities. This blending also serves to ensure that the final product has less variation in fertility and quality. As the picture below attests, in short what comes out of that sifting process is black gold.

Now I defy you to tell me that isn't some good looking compost, makes me want to go plant something right now!

The final stop in the process that produces 'Carolina Gold' is the measuring, as noted before the sifted compost is stored in Rubbermaid storage totes of the 18 gallon size. For sale the compost is packed in gallon/4.5 pound bags like the one sitting on the lid, and is distributed to BL2 customers upon request by either tote or by bag. About 30% of all compost produced is used in the test gardens. It is a little known fact that the reinforced mound bed whose center mound is raised some two feet is centered over a pile of Carolina gold a foot thick the lower portions of the bed are over 4" thick layers. 


Bag it and tag it! This is the next to last stop for our prize soil conditioner,  the next stop is in a garden somewhere near you perhaps.

In short, the way we produce compost at BL2 is one of many ways to make compost. In my decade of time as a landscaping professional, I have seen dozens of types of composters and several times as many methods, styles and concepts. The fact is not a single one is wrong, they are all different and they all have advantages and disadvantages. My way is angled to someone who has the tools but not the time to fuss over a compost pile but also has no shortage of good materials to feed said pile and ample amounts of pine straw.  I should note for all of you that there are several major forms of compost pile as noted below.

1.      Open Pit Type – literally a open it in the ground
2.      Single Bin Type – A single chicken wire bin held up by stakes (the type I use).
3.      Multi Bin Type – Multiple bins allowing for easy turning, typically made of treated lumber, plastic resin or sometimes concrete dividers.
4.      Rotating Barrel – popular in some places the barrel does help make turning easier, and comes in two varieties, horizontal and vertical rotation types.
5.      Mound Type – The opposite of the pit type,  this one is heaping pile capped with soil or mulch.

Additionally it is important to note the dos and don’ts of managing compost piles.
1.      Do use vegetable scraps.
2.      Do use potting soil.
3.      Do use dried brown leaves (dropped leaves in autumn are perfect.)
4.      Do use Leaves that are still green. (think grass clippings.)
5.      Do NOT use fats, or meat. (May attract vermin)
6.      Do NOT use bread. (May attract vermin)
7.      Do NOT keep pile wet. (will cause odor and may stop all decomposition)
8.      Do NOT use wood. (May attract termites)

As a final note for soil conservation and composting remember this, every time I see the Department of Agriculture at an public event they have these neat little pins that say "No Farm, No Food."  and I agree but when it comes to preserving the soil I would insist they should say "No Soil, No Farm, No Good!".

Thank you again for tuning into a somewhat long post on composting, I hope you enjoyed the look at composting and the way we make compost at BL2. Next weeks article will be about fertilizer alternatives.


Monday, April 23, 2012

Feed your head? No feed the soil first!


Welcome back to another edition of Lost in the Farmer’s Market albeit delayed due to a spring cold, and today we have a double-header. First on today’s list is a plant spotlight for a very interesting house plant and then the main feature.

In the business it is not hard to come across odd things at suppliers and in garden centers, the hard part is remembering that you are in these places to buy things for clients and not for yourself. I admit while walking through the green houses of a supplier in search of purple heart plants I saw something I just had to buy. The plant in question was a far cry from what I was looking for and thus we have today’s plant spotlight, and the plant in question is Spear Sanseveria. For all you botanical latin fans out there you might recognize the word ‘sanseveria’ as it is the first part of the name Sansevera trifaciata or as we commonly know it, ‘snake plant’ ‘Devil’s Tongue’ or ‘Mother-in-Law’s Tongue’.  The spear sanseveria however is a differing animal; instead of having broad flat leaves with banded green and white striations the spear instead has round leaves.  By round I mean cylindrical, with a pointed tip no less that of course is where the ‘spear’ part of the name comes from. For all of you out there who need to know the botanical Latin name for the spear sanseveria is Sanseveria cylindrica. Like its more common cousin, the spear sansevera grows from an underground rhizome and is suited to long periods with no watering. The spear sanseveria however has evolved a form that reduces the surface to volume ratio of the exposed leaves and thus they survive well in the sweltering heat of their native Angola with little problem.


 Honestly this picture does spear sanseveria no justice, the above is three growing tips from a single rhizome.

In home cultivation this plant is rather rare to see as it is very slow growing and absolutely does not tolerate constantly moist soil. Not unlike an aloe, if kept wet to long the plants will rot and fall apart, and also are quite happy in a pot for a very long time without repotting. The soil mixture for these plants if you can get one, should definitely be cactus soil but barring the ability to buy that try to make a soil mix that has some fine gravel and about 50% sand in it to mimic now nutrient arid soil. One thing that is worth noting, indoors in a somewhat shady location this plant is able to go without water for up to two months, and about two weeks if grown in a hot and brightly lit area. Once the weather warms in the summer and stays above 60 degrees at night these houseplants can be moved to the hottest areas of your garden as temporary displays. Cuttings of this plant can be taken in the same manner as other sanseverias, cut a roughly 3” piece off a leaf tip, allow it to dry for a day or two, dip the cut end in rooting hormone and insert half way into any decent potting medium then be very patient, as it may take weeks to root. If you are resistant to disfiguring your plants by lopping off stem tips you can also wait for the plant to naturally form smaller offsets or ‘pups’ as they are some times called and split those off when repotting. Lastly if all of the above did not blow your mind, note that the Sanseverias are in the Asparagus family, though I must admit I have no idea if they are edible or not.

Now with all that covered today’s topic, is an extension of the week before last, where I covered how one turns under a green manure crop. But what does one do if they did not sow a green manure crop what do you plant then? The answer is simple you perform a few easy actions to get your soil ready.

 
 1. Remove all mulch and any plants in the bed area.

2. Loosen the soil and Use a shovel turn one side of the bed’s soil over, make sure to dig to a depth of 6”.


 3. Add any kind of soil modifier you need to, like lime for example.

4. Replace turned soil and repeat process on other side, then smooth out the soil and top dress bed area with compost, or soil amendment and blend into upper 1-3” of soil surface.


5. Smooth out the soil and apply old mulch if still in good condition and/or new mulch as needed. You may also plant  your crops as needed in your newly mulched areas at this point.


6. Water the bed to allow the soil to settle and to ease transplant shock for your crops.


In short with just a little time management and planning one can revitalize a soil  if no green manure crop is available but more then that with a little planning one can also have an excellent crop in the ground sooner rather then later and extend the season by a few weeks.  It is worthwhile to note that the lime used above is agricultural lime,  this particular form is an easy spreading non-burning type that essentially is finely crushed limestone. The soil amendment seen in step 4 is my own compost, about 1" of it. For amendments most nutrient rich compost products will do good examples include mushroom compost, black kow, black hen or even something as inexpensive as scotts topsoil without the fertilizer. Your own compost of course whould only be applied if it is as well decomposed as seen in the picture above where no chunks of what you have composted are readily visible. With all luck, you'll be feeding your soil and for all that effort, your woil will feed your crops which will feed you.

Check back next week for our next article "The making of black gold" where we at LITFM crack open the compost pile and demonstrate how to turn raw compost that has been sitting undisturbed for almost two years into workable quality material. Also we will have a plant spotlight regarding the Orchid Primrose, a short-lived perennial that defies what you would expect from the primrose family.

Thank you for reading!


Sunday, April 15, 2012

The annuals you thought you knew


Welcome back to another edition of ‘Lost In The Farmer’s Market’ your weekly guide to the world of organic gardening and urban farming.  Before we start with today's topic I’d like to take a moment to mention the name of the Neighborhood Grange has changed to Sustainable Neighbors, and a link to their meetup page is below.

www.meetup.com/SustainableNeighbors/

Now today, Lost in the Farmers market will be covering the issue of plants that are often mislabeled or identified. The first thing to know is that plants are illiterate, they cannot read their labeling and may not perform in the way you are expecting.  Some plants are commonly mislabeled by their life cycle and here are a few.

Dusty Miller (Centauria cineraria)

This member of the aster family is often called an annual when in fact it is a rugged semi-herbaceous perennial. The problem arises from the fact it is often used as a bedding plant along side obvious annuals. A well kept stand of dusty miller can keep weeds down and form the foliage contrast for any perennial border along side hardy chrysanthemums (dendranthema morifolium).


Lantana (Lantana camara)

Lantana is a verbena relative that is noted for its upright habit as opposed to verbena’s trailing creeping habit. Lantana is often considered an annual due to how most people tend to use it but in truth with some protection is actually a semi-herbaceous or tender perennial. The issue is that a few zones south it’ becomes a reasonably reliable perennial where as we in north Carolina are right on the edge of it’s perennial range. Most garden centers don’t want to split hairs and thus it gets labeled annual.


Petunia (Petunia x hybrida)

The petunia in all its forms including wave, million bells and traditional forms all despite their labeling can in fact persist for years. The key factor is location, petunias can take on a perennial-like habit if provided good soil ample moisture and a spot near stonework were the stone or masonry can provide radiant heat in the colder seasons. A good layer of mulch never hurt however, I must admit petunias are durable but they’re more or less a tender perennial in North Carolina, and care must be taken if you want to keep them going for more then a year. Case in point, at the skye project’s test gardens is a calibrachoa or million bells that volunteered from seed in a potted cactus in 2007 at the New Jersey test garden and has persisted from the same root stock ever since, it survived the trip to North Carolina and gets larger every year. In short as of June 2012 this petunia will be five years old. I might add this plant receives less care due to it being in with a cactus, and does NOT come in for winter.


Snapdragon (Antirrhinum majus)

The common snap dragon is often sold as an annual but in truth individual plants in the right conditions can persist for years. The key is soil quality, healthy layers of mulch and regular amounts of water. In the north typically a snapdragon will die back to the root or some part on the stem and return in spring making it an herbaceous perennial.  The thing about snapdragons is that they prefer cooler weather and cool soil, so in the south to successfully grow snapdragons as a semi-perennial one has to provide regular water ample mulch and plant them in partial shade.


Verbena  (Verbena x hybrida)

Verbena is a massive plant family including a wide number of garden plants such as lantana, lemon verbena aand vervain. This plant is often labeled as a annual however with the right conditions and care in the south it can overwinter in an evergreen form for use the next year. The key to overwintering verbena is to keep it maintained, cut away dead foliage and by all means if in a pot keep it watered when it needs it. It is noteworthy that the ‘Homestead’ varieties of verbena are said to be more durable and reliable as a perennial.

In short, yes there are some annuals that are plainly annual such as impatiens, portulaca and pansies/ violas and we must remember that the seasons in which they are at their best are somewhat short. However when you are out buying bedding plants this year remember to look for those that get you more bang for your buck. Even an annual that reseeds can effectively save you more time and effort then rebuilding a bed every year. But those few that persist may save a fortune over time in garden costs for plant material as long as to heed their care and install supporting permanent plantings your garden should be top-notch every season.

Stay tuned to LITFM for next week’s post “Feed your head? No, feed the soil first!” how-to photo journal of what it takes to re-enrich a production bed when no green manure is available.  Thank you for reading.

‘Keep ‘em growin!’

Tuesday, April 10, 2012

Who ever said manure had to be brown?


With spring comes renewal, and in that light the original article for today’s post was delayed due to both the holiday and the need to do a bit more data collecting to make sure it was up to snuff. In the place of ‘The annuals you thought you knew’ we have today’s topic. Today I’ve got a photographic article covering how to turn under a green manure crop. For those of you who have been to my booth at Urban Farm Day or at the Neighborhood Grange meetings, you will recall I spoke on the use of Mustard as a ‘green manure’.  For those unfamiliar to the term a Green Manure is sometimes called a cover crop, it’s role is to hold the soil during a period in which you are not actively producing a crop.  Cover crops are often turned under at the start of a growing season to return nutrients to the soil. Common cover crops include Winter Rye, Clover, Mustard, Vetch, Peas, Beans and, any ‘annual’ production crop.  With all that said here is the photo montage of me turning under my Red Giant Mustard crop, as it had all begun to bolt.


Step 1: Determine if your cover crop is at the end of its usefulness, as seen here all of these mustard plants are bolting or going to seed which is a process one can’t stop once it has begun.


Step 2: Pull crops up if possible, if not simply use tiller to turn crops under.  If your pulling the crops like I did here note that the upper six inches of soil was dug up after the pulling and placed in a wheel barrel temporarily.

Step 3: Move pulled crops so they are easier to chop up; in this case I piled them up so I could take a manual edging tool to them to break up the leaves and shoots.


Step 4:  Oh the Humanity! Murdered Mustard Greens everywhere! Seriously between the trenching shovel and edging tool these mustard greens are chopped pretty good, they’ll decompose fairly quickly.


Step 5: Using a long-handled cultivator the next step is to mix the chopped greens in with the remaining soil in the planting bed. This helps introduce soil organisms to their new food source.


Step 6: Return the removed soil to the planting bed, if you recall it was moved there as part of step 2.


Step 7: Hose it down!  The purpose of this is again to encourage the organisms in the soil to find the chopped up mustard and to settle the turned soil. This step may or may not be as practical on larger bed areas though.

 Step 8:  Apply a mulch of some sort and allow the bets to sit undisturbed for at least 24 hours before planting. A high nitrogen water-soluble fertilizer or Lawn dethatching chemical solution can be used to accelerate decomposition but neither is greatly necessary.


This seems like a bit of work, but it is worth it, as the effect of turning the soil in this way returns nutrients to the soil also it has the effect of saving a bunch in fertilizers and soil amendments. In my case the mustard is perfectly edible and serves as a winter food crop until it becomes time to convert it in the way shown above.  For you grangers out there the bed pictures is one of my three high production beds two of three of which are a foot tall overall and nine feet long by three feet wide.  Since all of the high production beds are raised they all have heavily enriched soil that is 90% compost by volume. The advantage is that there is quite a lot of produce for a very small area the problem is that they are some times difficult to keep watered and I have to re-enrich them between crops. However the ecological foot print of the beds is tiny, virtually no fertilizer is ever used nor is any pesticides or herbicides as the height keeps most weeds out and the plants largely can defend themselves.

I hope this photo-post was useful to all of you if you like the idea of this sort of post let me know and I can do more, if you have any questions or comments feel free to ask. Next week LITFM will actually cover “The annuals you thought you knew”.  Thank you for reading.

Sunday, April 1, 2012

“Spring Shenangins!”


April has arrived, and today’s article is sponsored by the makes of the Chia pet who have a new product, the Chia Pundit, available in the likenesses of Rush Limbaugh and Keith Olberman! The spacious noggin planters allow you plenty of room to grow enough of whatever you prefer to feed a small neighborhood!
.
..
No, hold the phone that was not really a product but then again Chia pet did do an Obama and Clinton planter so who knows if they’re already brewing that up! Yes today is April Fools day and what could be a better way to highlight the date then to briefly talk about some odd garden devices that get a lot of press but have dubious value.

Topsy Turvy Tomato planter
This one looks great and all but it has one major problem, tomatoes don’t like wet foliage, and as of yet no average gardener can actually confirm the claim of bigger or better tomatoes. It’d be smarter and cheaper per plant to top-dress your beds with compost yearly, and plant your tomatoes an inch deep on the stem. additionally the claim of improved flavor and color by virtue of gravity is unfounded as the cellular-vascular system of most plants would inherently be pumping the good stuff right to the fruiting bodies anyway regardless of position.

Cow pots
Apparently someone somewhere thought making biodegradable pots out of cow manure was a good idea. While composted cow manure makes for an excellent source of soil replenishment, the cow pots seem a bit well much. The part that makes this odd is one has to ask, what do they use to clear out the plant pathogens and how exactly do they make the pots paper-like and firm?

Fertilizer Enhanced potting soil/ Garden soil
This is complete corporate shenanigans, I’m sure you have all seen that miracle grow commercial where they show this patch of terrible dirt and talk about how bad it is and how it will ‘Hold your plants back”. After the commercial talks about your soil and briefly about their product they go on to show a picture of a scraggly plant grown without their soil and a lush gorgeous plant grown with their soil.  The obvious scam here is that magically their peat-based fertilizer laced soil with stuff to aid in moisture retention will solve all the problems. The truth is good quality soil shouldn’t need integrated fertilizers or moisture retention product to produce those results.

Extended Control Pesticides/Herbicides
I’ll admit I don’t have much use for pesticides or herbicides except in the case of handling poison ivy, fire ants or the rare wasp/hornet’s nest that is in a bad location. However the real issue with the extended control products is the lack of extended control. For example in the industry it is a well known fact that a pre-emergent herbicide stops doing it’s job the moment the surface it its applied to is scratched or otherwise physically disturbed. Extended control pesticides and herbicides are the same, they stop working the minute the surface they are applied to changes. So spraying leaf litter beside your house for insects becomes useless the moment the leaves are blown away. Up to 6 months indeed, and the herbicides are no different but of course the makers of these products generally do not warn you of the exact things that counter their product’s strengths.

Chemical Industry ‘Problem Solver’ Books
Yes Ortho we mean you, you’re the worst offender, though Miracle Gro, and a few others are equally guilty. Obviously these books are good for their color pictures of the weed disease or pest problems. The books are bad in that apparently the solution to every nuisance no matter how trivial is to buy and use only their products

However today at LITFM, we are talking about preparedness.
As the weather grows warmer, and the rains will be come less frequent now is the bet time to start your last batch of slow-developing plants for summer and your most heat tolerant spring food plants such as lettuce. The gardeners reading this in more northern climates fortunately have more time to start their cool-season plants. Seed starting aside, now is an excellent time to transplant your seedlings to larger pots in preparation for their placement outside.  There is one phenomenon to note that occurs as a side effect of the act of transplanting seedlings. Your seedlings if grown expressly under a humidity dome will likely wilt when the dome is removed after transplanting, if watered well after transplanting then this form of plant-drama will pass.

Seedlings aside we all know the garden centers are brimming with vegetables, herbs, flowers and fruiting shrubs.  We as responsible urban farmers should pay more attention to the USDA’s last frost dates for spring which vary by region as noted below.

Last Spring Frost Date:
  1. In the north Mother’s day or about May 15th. (New Jersey)
  2. In the south: Easter or about April 14th. (North Carolina)

 And lastly remember to enrich your soils before plant, with compost or some sort of composted manure product in direct proportion to your soil use in the winter. If you grew winter crops, then use more enrichment to put back what you took out, and in respect merely top-dress as needed if you did not. Tilling is not a necessary process if you have an established bed but may be useful for building a new bed during the first addition of organic materials.

Just some events to note, on May 12th is the Urban farm tour, I’ll have a booth and of course you can expect some cool stuff for sale and freebies!  In the next edition of Lost in the farmers market I will be talking about the annuals you thought you knew. As always if any of you readers out there have a question or want to request a topic be covered feel free to post a comment or request it at the neighborhood grange meeting. Lastly for you grangers reading this, a full list of plants for sale at urban farm day will be available at the meeting. Thank you again for reading, keep ‘em growing!