Welcome back to another winter edition of lost
in the farmer’s market. Today’s topic is one of critical importance as the winter
weather seems to be more dangerous then ever. However we will not be talking
about road hazards or winter driving, instead today the topic is about
winterizing your rain barrels. It should be said that aside from the standard
procedure of disconnecting the downspout from your installed rain barrels and
emptying the water there is no absolutely safe method to maintain a functional
rain barrel during the winter.
That said since the concept of rain barrels for irrigation went mainstream and is now subject to what some think of as 'trendy design' the durability and styles of rain barrels now vary greatly. If you check out Amazon.com or merely Google the words rain barrel you can see the great variety produced for public consumption these days. However all rain barrels are vulnerable to freezing. Today we will be using the skye projects own rain barrels as an example we will demonstrate some virtually free of cost methods to secure your rain rain barrel against the erratic winter cold in 2013.
For note the Rain barrels used by the skye project are the pickle barrel style sold through the Cooperative Extension Agency in town. I prefer these because the material that the actual barrel is made of is food grade plastic that is resistant to the corrosive fluids used to make pickles. This means that were I desperate I could boil the water to kill bacteria and pathogens then run it through a set of ceramic and charcoal filters to make some kind of potable water with no plastic byproduct contaminants. The first step to preparing your rain barrel begins with the overflow fitting on the upper right or left side of the barrel's body.
 |
| Step one, Remove any overflow hoses attached to the overflow fitting, as they may burst if they are full or partially filled with water. |
 |
| Step two: If your rain barrel has an additional fitting such as the elbow and hose hookup connector like the one pictured remove it if you can as ice may burst or damage the elbow if the barrel is full enough. |
 |
| Step Three: Once the elbow fittings are removed allow any excess water to pour out. In this case for note the original fitting is the white piece connected tot he barrel but the part the water is pouring out of is a plug adapter that allows the elbow to be attached. I cannot remove the adapter because it is glued in place as the original adapter lacks threading. |
The second half of preventing frost damage to your rain barrels is to protect it's most vulnerable part, the spigot or spout at the bottom of the barrel. As you can see below, the pickle barrel types feature a reinforced Boiler drain spigot which means it can handle extremes in temperature within reason. Before I took this series of photos this guy was frozen solid which gave me quite a scare. It did eventually thaw but it was too close of a call for me. So here is a inexpensive way to protect this sort of spigot.
 |
| This is your spigot, you want to make sure it is closed before you start |
 |
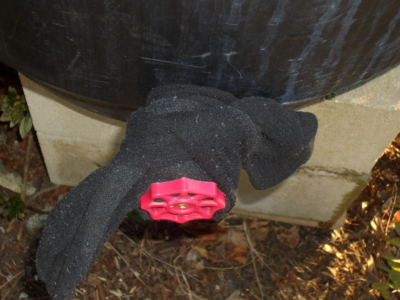
| Step two: Get an old worn out sock, and wrap it about the spigot taking care to cover the opening and all parts except for the handle. I use black socks because like the barrel they tend to stay warmer then the air temperature and once the sun hits them they will thaw any freezing in the spigot rather fast. |
 |
| Step Three: Since the first sock isn't actually held in place by anything, a second old sock placed at the angle shown above will serve to hold it all in position. |
 |
| Step Four: Tie old Sock #2 in a loose knot to hold the whole thing in place. Remember that if the weather forecast calls for low temperatures and rain you may have to protect this further by using a supermarket shopping bag over the whole assembly. |
As a third point of reference some times you cant remove the overflow port or it's fittings from your rain barrel because the port will expel water too close to the foundation of a building. Should this problem arise, the solution is pretty easy just take a look at what has been done below.
 |
| Step One: Remove prior overflow hose fitting. |
 |
| Step two: If possible rotate the elbow fitting so it faces away from nearby structures. If this is not possible then allow your self a few extra feet of hose for the next step. |
 |
| Step Four: Attach one of your better quality hoses to the elbow connector and prepare to find a place to aim the flow. |
 |
| Step Five: You want to have enough hose to direct the overflow away from structures, paths and vehicle traffic. As you can see this hose gets the overflow a good distance from all of that but is in risk of being run over by the vehicle in the upper right corner. Some hose adjustment clearly is needed, but the placement of the hose meets all other criteria. |
 |
| Remember, any spigots attached to the building need protection too, if you have a flow splitting device such as the one above remember to turn off the water and leave the individual valves of the splitter open. |
With all that covered I must repeat, not all rain barrels have the same features, I would be no less cautious with metal fittings then I would with plastic. It is up to you to make that critical judgement call as to how and what you do with your rain barrels, but I know this, putting a new spigot on is a pain and so is replacing a burst rain barrel so consider the weather and be mindful of frost activity. Oh and remember to keep 'em growing folks.


No comments:
Post a Comment