Due to technical issues with the Photographs used in this post, this is a revised version of the post from the 10th.
When it comes to growing things from seed or sometimes keeping prized plants healthy in the bleak days of winter, we have a tool at our disposal that helps things keep going for our photosynthetic friends. Grow lights are thought to be a derivative of the original lightbulb that was ‘invented’ by Thomas Edison back in 1879, however the theoretical work for grow bulbs was proposed by Mangon in 1861 and Prilleux in 1869 respectively. It’d be quite some time before anything resembling the incandescent grow lights would be available but it does demonstrate that science-minded plant geeks have been around for a while. Growers would have to wait until 1930 when a lightbulb was tested using noble gasses within the bulb to create differing spectra of light. The first real grow lamp came into being circa 1950 to 1960 and came in the form of a sodium/ metal halide light bulb that up until recently was the prime choice of lighting in streetlights, and at stadiums for its high output. For growers the output did come at the cost of emissions of heat as a waste product. The heat output of a sodium bulb was its greatest weakness as it posed a fire hazard in certain enclosed spaces. This heat also expressed itself in the infrared spectrum which is why when certain parties are illegally growing whacky tobacco, the police will use a thermal imaging scanner to spot the growing operation.

Despite the limitations of sodium bulbs, variations of incandescent light bulbs filled the niche where sodium bulbs could not for the small grower. They had a power usage that was lower than sodium lighting, they produced less waste heat, and by the 1980’s the price of full spectrum incandescent lighting started to drop into affordable ranges. Home growers could readily afford incandescent grow bulbs and this indirectly spurred the resurgence of the organic food movement in the 1990’s. Now anyone could have a greenhouse in their home in a spare room and this of course caused a rise in the number of seed catalogs and a demand for more species of plants and more varieties of already known plants. It created a horticultural revolution, but of course the dominance of the incandescent grow light was flatly challenged when fluorescent grow lighting’s price started to become affordable in the early 2000’s.

Florescent lighting at its worst is known for casting that sort of pale light you see in offices with cubicles and employees looking rather dead inside. At its best fluorescent lighting is known for its use as accent lighting to accentuate certain colors in conjunction with normal incandescent lighting to get a rough approximation of natural sunlight. You see, fluorescent lighting like incandescent lighting uses gas to create light. Though there is no filament running the length of the tube in a florescent tube light, at each end is a tungsten electrode in a short coil that sends electricity across argon gas. As a crazy side note, if you take a compact florescent light bulb that is not screwed into a socket and touch it against the glass of an active plasma globe, the CFL will light up as if plugged in. This is because the energy from the ionization of the gasses in the globe can actively convey a charge into the gas of the CFL, which in effect is wireless energy transfer. The active ionization of the argon gas is why sometimes you can see a florescent light bulb pulse as it starts up especially if the air temperature is below fifty degrees. Interestingly, florescent lights all have a small amount of mercury in the tubes, this mercury is vaporized by the ionization of the argon gas and its role is to produce UV light. This light strikes phosphor coatings on the inside of the tube which convert the ultra violet light into useful visible spectra. Depending on the coating you can get any number of colors out of a florescent light and thus the formulation to make one that emits a spectrum of light best for your plants is born. Typically florescent grow lights focus on two spectra, red, and blue, but for the home grower’s purposes one focusing on blue is better. Plants react to the light they receive in certain ways; red spectrum light tends to induce fruiting and blooming while blue spectrum tends to induce growth in general.

Now of course it is 2020, and for the last few years the price of Light Emitting Diode technology has dropped well enough that anyone can afford it and indeed LED grow lights are here to stay. LED grow lamps have some distinct advantages and disadvantages; It is safe to say that LED’s generate less heat that florescent lights, and use less energy than comparable output florescent lighting. Manufacturers are now making banks of LED’s in the same shapes and sizes as their incandescent, Sodium and tube florescent or Compact Florescent Light competitors which means that physical size isn’t a limitation. The downsides of LED’s are just as numerous, when one LED in a group starts randomly flashing, all the rest are soon to follow. LED’s can’t be full spectrum individually; Typically LED lighting will have a cluster of one color of diode, or a mixture of white, red, blue and yellow LED’s in the cluster to mimic sunlight. Individual LED’s have descent output but they are usually clustered to get maximum impact, which can be a space issue as the actual shape of the lighting sometimes has no match otherwise. Also LED’s are getting less expensive every year however on average they still can cost a bit more than comparable florescent lighting if you are buying quality product.
The big question is which lighting option is good for you? Well, if cost is any indicator it looks like incandescent or florescent is the best for small growing operations due to cost and flexibility. LED options are good, but they aren’t quite as cost effective unless you can write it off as part of a business plan or you have the assets to ignore the costs associated with them. Sodium lighting is flat expensive and risky for numerous reasons, there is no reason a home grower should be using such a thing because of the cost of additional equipment. Now as you all know Bordeaux Regional Nursery uses a LED illuminated setup indoors and a Florescent setup in the laboratory. This mix is ideal for my operations as it is the right blend of energy efficiency, and practicality. Also as noted out in the lab I use T5 florescent bulbs which are 4” long, emit light on the blue spectrum and have a 5,000 lumen output each which is pretty bright. However this amount of light pales in comparison to the brightness of actual sunlight which can be something like 130,000 Lux (lux is just lumen per square meter). For comparison, those two 5000 lumen bulbs are individually five times more powerful than normal office desk lamps (100-1000 lux), but individually half as powerful as the lighting in a surgical theater (10,000 lux). What is interesting is that grow bulbs will often come with a rating in Kelvin, my T5’s are rated at 6500 degrees, which means that that the hue of the light being emitted is rather close to sunlight. When it comes to Kelvin ratings things that are 3500 or less tend to have an amber hue and less resemble actual sunlight. Halogen bulbs (remember those?) operate at about 3200 K while incandescent lighting operates at around 2600K. This is important because the Lux/Lumen and Kelvin rating of a lightbulb will change how high above your plants you will have to suspend your grow lights to get the best possible effects. It’s normally recommended with a 2” long t5 type grow bulb to suspend the light just 2-3” inches above seedlings as the output is 2,000 lumens. My T5 4” producing 5,000 lumens can safely be hung 3-5” inches above seedlings to get the best effect. The rough rule of thumb is 0.75-1.0 inches per 1,000 lumens however this may vary with the type of plant being grown, the speed of growth and the mitigating factors such as heighted of seedling tray and or humidity dome. Plants beyond the seedling stage can have the noted height doubled or tripled as long as there is no contact between the foliage and the light fixture.
But enough of the science stuff, let’s look at some garden pictures. First off we have Sustainable Neighbor’s garden problems, as you can see in my sink, that’s a lot of henbit (Lamium amplexicaule) and chickweed (Stellaria media). It’s such a crime really that even your ‘weeds’ should be so vigorous because you went out of your way to feed your soil that they are much larger than normal forage. In this case all the edible ‘weeds’ were picked from the vegetable patch I built last year and had sprouted under the canopy of the Kale, Collards, Chard and Mustard that had been harvested. I gave each of the ‘weeds’ a bit of fertilizer while fertilizing what remained in the vegetable patch and they pushed out super tender vigorous growth making harvesting them a worthwhile operation.

Henbit – Lamium amplexicaule

Chickweed – Stellaria media
Chopped up and bagged though the mass of wild greens looks a bit less impressive though surprisingly the greens with all the chaff and the zip lock bag subtracted still weighed over two pounds. Honestly if these were a leaf green at the market they would probably sell for as much as Dandelions (Taraxacum officinale) at about $3.99 for about a quarter pound of greens. At that rate, what I harvested should be valued at a similar rate making the entire bunch if considered on the same level as dandelion worth $31.92 before tax. Oh and I should not forget how much chaff and detritus these mat-forming weeds actually collected.

This is a wash basin full of Henbit and Chickweed, it looks like a tangled mess and is.


The above picture was just the beginning of the cleansing operation. You see, I kept finding little bits of pine straw in the weed clusters even after I was absolutely certain every speck of dead leaf, pine bark shard and whatever else was out. This brought an intriguing thought to mind, these humble little mat-forming weeds were really good at capturing raw organic material and making it stay put. I don’t know if this is a fluke of biology or part of the plant’s survival plan so that its later generations have good soil but it sure makes them good at countering wind and water based erosion and may play a role in composting leaf litter. Like many other weeds which have risen above the ‘weed’ status maybe chickweed and henbit are the next great converts into cultivated wild foods. I know this, if I see them at the market at exotic food prices I’m definitely going to laugh. Either way below is my favorite recipe for cooking up Henbit and Chickweed, you can substitute in any other leaf green that can be cooked if Henbit and Chickweed are in short supply.
Henbit & Chickweed Curry
Ingredients
4 Cups of Chickweed and/or Henbit shoots
4 Cups of water
1 Teaspoon Curry Powder
3 Whole Cloves
3 Tablespoons of Butter
1 Teaspoon of Salt
1/4 Teaspoon of Cinnamon
2 Tablespoons of Flour
1 Cup of Sour Cream
Preparation
1. Chop the greens finely and put in a pot, cover with water.
2. Bring greens to a boil and cook for about 10 minutes or until tender.
3. In a separate pan melt the butter.
4. Add Salt, Curry, Cloves and Cinnamon to the butter and stir until all spices are moistened.
5. Stir and cook seasonings for 1 minute then add in Flour and then Sour cream.
6. Transfer 1/2 cup of water from cooked greens to Sour cream mix, stir thoroughly.
7. Discard the rest of the water with the greens.
8. Depending on which pot is larger add the greens to the sauce or the sauce to the greens.
9. Mix greens and sauce fully and simmer for 5-10 minutes and serve over rice.

Now look at those red stems, the stuff at the supermarket can’t even compare.
Speaking of the vegetable patch, check out this glorious Swiss Chard (Beta vulgaris, variety cicla). I grow Chard every year partly because man, it is super-dramatic with those stem colors. I can literally see the bright red ones from across the yard and they call to me to do something inventive in a culinary sort of way. The chief advantage of Chard is that it can replace Spinach (Spinacia oleracea) in every single way. It has the same texture cooked or raw, the green types look similar in a salad but you also get additional colors in the stalks which offers a wider array of nutrients. Chard is also utterly immune to southern winters, it also tolerates a fair amount of southern heat too so it’s tougher than Spinach. Interestingly, they both belong to the Amaranth family it’s no surprise their characteristics are the same. Beets (Beta vulgare) and Chard are divergent of each other but largely in a botanical aspect identical, one doesn’t make a root and the other does, in both cases the greens are edible.

Mustard (Brassica juncea) on the other hand is in the cabbage family. Now this particular variety is Japanese Red Giant, and you can clearly see why it is called that, the leaves turn an amazing reddish-purple color in cold weather. Flavor wise they can be spicy if eaten raw, but when cooked they are only slightly more potent than the normal grocery store mustard greens albeit with a garlic overtone. This one leaf was photographed because it broke the previous length record for a Japanese Red Giant Mustard leaf by three inches, the current record is now two feet long (24”).
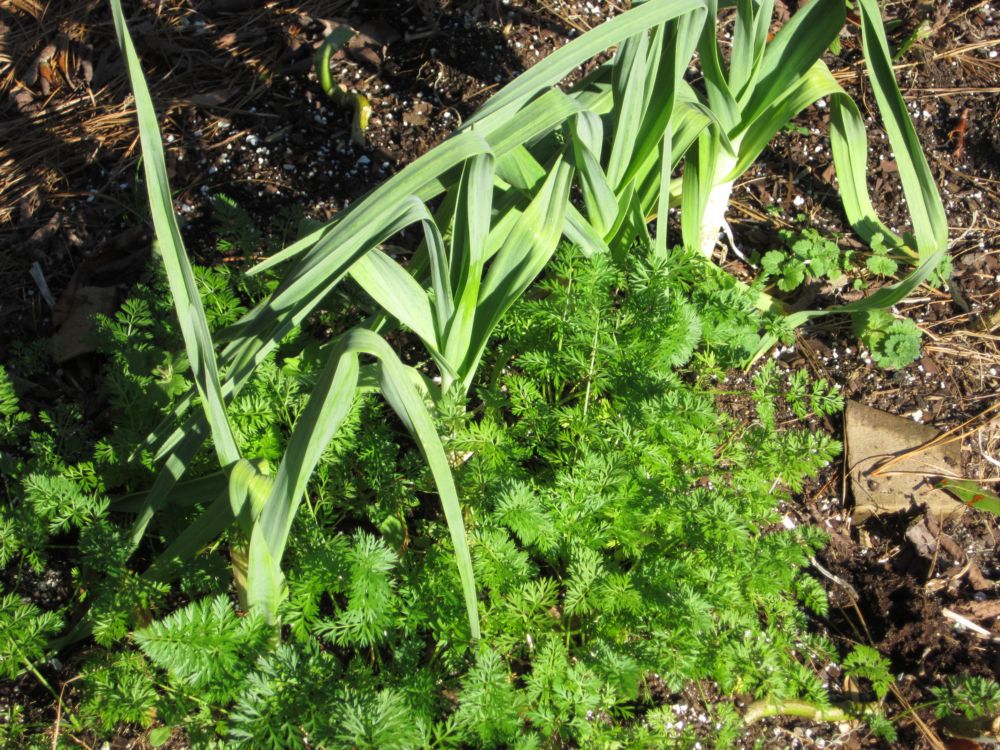
Since it’s come up I thought it’d be neat to show a little companion planting in action, here we have Elephant Garlic (Allium ampeloprasum var. ampeloprasum) growing with Danvers Red Core Carrots (Daucus carota subspecies sativus). These two garden plants get along because their growth habits do not compete despite both being primary root vegetables. Even the shape of the roots ensures they do not compete as garlic spreads at a certain depth while carrots dig downward in give or take a straight line. Garlic’s foliage is also roughly straight upwards with spread out leaves jutting out at odd angles. Carrots for a loose canopy which can discourage weed competition so they just work well near each other. Garlic in general is a good neighbor to a lot of other plant species as are carrots because they are pretty space-efficient. This leads into the fact that a lot of companion planting is about matching up growth habits and mature plant shapes so your crops can grow in physical and biological harmony. But companion planting is a topic for another post.
With all that garden goodness covered this is the part of the blog where I have to advertise for the Fayetteville City Market. Now I know you readers probably don’t much like advertisements, but by booth at the City Market helps to cover the costs of running the test garden and literally maintains the Research & Development budget that is used to bring you the information that has made up the backbone of this blog. Also, as of the start of 2019, my booth can now process credit or debit cards thanks to the acquisition of s a Square reader so your payment options have doubled. With that said, if you want to get some GMO-free, Organic vegetables, herbs and fruiting shrubs come on down to the Fayetteville City Market on 325 Maxwell Street in downtown Fayetteville between the Hours of 9:00 am and 1:00 pm on Saturdays. Even in bad weather the market goes on though you might have to look for me under the ‘arches’ of the Transportation Museum’s front entryway.
Plants & Stuff Available Now:
Plants:
Celery, Tango: $3.00
Beet, Bull’s Blood: $3.00
Herb, Tansy: $3.00
Herb, Black Fennel: $3.00
Lettuce, Buttercrunch Bibb: $3.00
Lettuce, Cherokee: $3.00
Lettuce, Reckless Fire: $3.00
Lettuce, Red Parris Island Romaine: $3.00
Cabbage, Pak Choi: $3.00
Kohlrabi, Grand Duke: $3.00
Potato, Red Norland: $3.00
Rhubarb, Victoria: $3.00
Swiss Chard, Bright Lights Mix: $3.00
Other Stuff:
Soup Kits: $6.00
Seasoning Packets: $2.00
Garlic, Whole Bulb: $1.00
Coming Soon:
Abutilon ‘Orange Hot Lava’
Cuban Oregano
Common Sage
Lemon Grass
These days I am generally at Leclair’s General Store once a week, for the weekly Sustainable Neighbors meeting at 5:30pm through 7:00 pm. If you have questions then I will be there to answer your questions. Since our meetings have an open-door policy you don’t need to sign up for anything or join anything, you can come on in ask for us and join the meetings. If not, you can always send me questions through this blog or visit the farmer’s market or pay attention to what Sustainable Neighbors is doing at the link below.
https://www.meetup.com/SustainableNeighbors/
This brings to a close the fifth LITFM post of 2020; stay tuned the next episode which should be posted on the 20st of March. There will be more garden updates and other cool stuff.
No comments:
Post a Comment